
Inquisit has built in support for interoperating with Cedrus RB-Series and Lumina response pads and other devices that use Cedrus' XID communication protocol. Cedrus response pads can be used with Inquisit on both Windows and Mac platforms.
The RB-x30 devices are the third and, as of the time this article was written, latest generation of response boxes from Cedrus. These and the Lumina response pads use a communication protocol called XID that defines a set of commands for sending and retrieving data to and from the device. Inquisit uses this protocol to automatically (i.e., no manual configuration) connect to the device, and to query the device for responses and response latencies as recorded by the device's built-in timer.
The first step in using the response device is to plug it into a USB port on your computer and install the device driver (which you can download from Cedrus' web site).
Once the device is plugged in, you can communicate with it in Inquisit by making a few simple modifications to your task script. For example, if you are modifying a script that is configured to use the keyboard for measuring responses (either inputdevice is set to keyboard or it's unspecified, in which case Inquisit defaults to the keyboard), you simply need to set inputdevice to XID, either as the default for the entire script:
<defaults>
/ inputdevice = XID
</defaults>
Or specifically for a given trial:
<trial target>
/ inputdevice = XID
</trial>
You will also need to configure your script to handle the specific numeric values returned by the buttons on the device. To discover the button values, download and run the response pad sample from our Cedrus page. This is a great sample for scripting against an XID response device, and it will display the numeric values of any button you press. Once you know the values, you can update your script to treat these values as valid or correct responses:
<trial target>
/ inputdevice = XID
/ validresponse = (2, 6)
/ correctresponse = (6)
</trial>
If you'd like to access advanced properties of the response pad such as the response time as measured by the onboard timer or the id, port, or action of the last-pressed button, you can define an xid element as follows:
<xid rb>
/ product = responsepad
</xid>
<trial target>
/ inputdevice = XID
/ isvalidresponse = [xid.rb.lasteventbutton == 4 || xid.rb.lasteventbutton == 5;]
/ correctresponse = [xid.rb.lasteventbutton == 4 && xid.rb.lastlatency < 1000;]
</trial>
If Inquisit suddenly stops responding to button presses, try unplugging your device and then plugging it back in. We've found ourselves having to do this on occassion.
If you have been unable to get Inquisit to recognize button presses at all, verify the dipswitches on your device are configured to XID mode. The dipswitches on the back of the response box control the response mode and baudrate that the device uses to signal the serial port. When the response box is shipped, all four switches on the device are down by default, which sets the device to XID mode at a baud rate of 115,200. See below for an illustration. Although Inquisit can use any baud rates supported by the device, we'll just use with the default setting of 115,200 for the sake of simplicity. If the dipswitches are in different positions, unplug the response box, return them all to the down position, then plug it back in. Be warned, you must disconnect your response box from the computer and then reconnect it for dipswitch changes to take effect.
The RB-x20 devices are the second generation of response boxes from Cedrus. These response boxes support only the "RB Series" communication mode.
Setting the Dipswitches
The dipswitches on the back of the response box control, among other things, the baudrate that the device uses to signal the serial port. When the box is shipped, all four switches on the device are down by default, which corresponds to a baud rate of 19200 (see the image below). Although Inquisit supports any baud rate, we'll just use the default setting of 19200 to keep things simple. If the switches are not all in the down position, unplug your device from the computer, flip them all down, and then plug it back in.

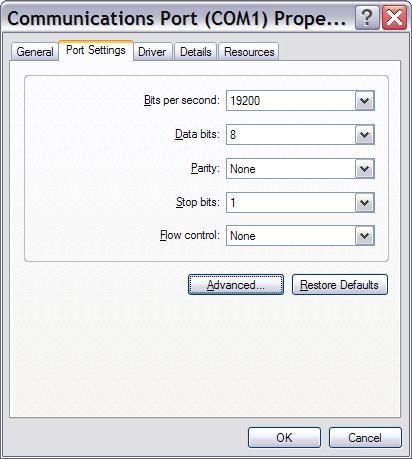
Configuring the Serial Port
Once all four dipswitches have been set to the down position, the serial port must be configured with the compatible settings. To configure the port, use the Windows Device Manager applet (on Windows XP, open the Control Panel, then the System applet, click on the Hardware tab, and click the Device Manager button). Expand the Ports node on the tree, right click on the COM port that your response box is plugged into, and select the Properties command. This will open the window pictured below, which allows you to configure the port. For the RB-x20 devices with the dipswitches in the down position, the port should set to the following:
If you haven't already, plug your device into the serial port of you computer. If your computer has multiple serial ports (COM1, COM2, etc.), make sure that you connect the device to the same port that you configured in the previous step.